Showing posts with label Photo Tutorial. Show all posts

Tuesday 24 November 2015

Photo Tutorial by Karine Gagnon
{Design Team 'Moment To Shine'}


Hello everyone! It's Heather McMahon back with you 
today to welcome you to another photo tutorial in our 
Design Team 'Moment To Shine' series. 

Today we have a stunning Christmas-themed layout by 

Karine Gagnon from Canada. Karine was inspired by our
 current challenge HERE.

We saw Karine's sneak peek in the mood board reveal 
now she is sharing a photo tutorial of how she
 made her so-sweet layout.


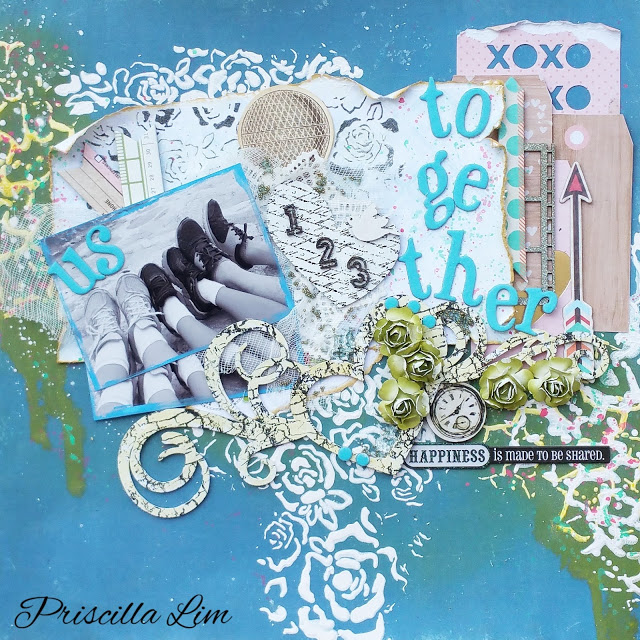
Karine was inspired by the colours of the moodboard, especially the 
blue in the candy canes picture. She also included texture from 
the moodboard: bark hearts to echo the branches from the tree & a 
canvas heart to echo the wool & marshmallow from the last picture. 


Let's get to know Karine a little bit better: 


"Hi, scrappy friends. My name is Karine Gagnon & I'm from Canada. I'm the 
mother of 2 very energetic children who are 6 & almost 3 now. They are the stars 
of my layouts. I'm also a high school French teacher & I love my job. I've been 
a scrap addict for over 10 years now & my passion for the hobby always seems 
to grow! I'm always trying to learn something new. I love mixed 
media & can't seem to create without paint or inks. 

I'm glad to be a part of Scrap Around The World's team & I'm feeling very 
honoured to show you how my layout came together. You can find my blog here
my Pinterest here, my YouTube channel here & my Instagram here." 

----------------------------------------------------


1) Prime the background paper (I chose a 13@rts paper from the Cosy Evening collection) with clear gesso & dry with a heat gun or air dry.


2) Apply modelling paste through a stencil to opposite 
corners of the page to add texture, then dry.


3) Adhere some torn doilies with gel medium. Glue the doilies to 
 roughly form the shape of an egg & dry.


4) Add some very heavy gesso over the doilies to add more texture & dry.


5) Add some joint tape over the doilies & in a few places on your paper. 


6) Add your choice of colour sprays, one by one, drying each colour before you add the next one. Add drops or splashes of colour for extra texture. 


7) Choose a few stamps with different patterns (I chose a grid, some squares 
& some typewriter words) & stamp randomly with ink. Try to choose ink colors 
that are close to the ones you used on your background.


8) Choose 1 or 2 more stamps & this time, stamp with black ink to add contrast.


9) Prime your chipboard pieces with white gesso. Sprays make this job easy.


10) Adhere your photo & embellishments in place.


11) Dry brush some gesso onto the embellishments with a small 
sponge brush. This helps to tie everything together. 


12) Adhere micro beads & glass beads on and around your flowers clusters 
with gel medium for some finishing sparkle.


The finished layout is a medley of gorgeous colours and textures.


Note how Karine has kept her embellishments clustered 
tightly together for a strong impact.


The background links the 2 separate clusters to create a cohesive look.


Karine has achieved stunning texture on both her 
background & her embellishments.


The products Karine used:


Supplies List

Papers - 13@rts

Clear gesso, modeling paste & 3D matte gel - Prima
Very heavy gesso - Liquitex
Sprays - Shimmerz Paints
Stamps - Kaisercraft, Prima, BoBunny, 7 Dots Studio
Inks - Archival (Ranger) & Stampin' Up
Chipboards - Scrapiniec
Spray gesso - Krylon
Micro beads & glass beads - Prima
Flowers - Prima & Wild Orchid Crafts
Washi Tape - Bazzill papers
Bark hearts - Prima
Canvas heart - Scrap Fimo & cie

Please leave a comment if you enjoyed Karine's tutorial
& remember every comment you leave puts you in the running
to win our $50 FOLLOWERS' PRIZE from The Dusty Attic!

Remember - there are only 6 days left to enter this month's challenge!
To be in with a chance to win 1 of our 11 amazing prizes you'll need to be quick!

You can find the challenge details HERE.

Compiled & posted by Heather McMahon


Saturday 24 October 2015

Photo Tutorial by Shilpa Nagaonkar
{Design Team 'Moment To Shine'}


Hello fellow crafters! It's Heather McMahon back with you 
today to welcome you to another photo tutorial in our 
Design Team 'Moment To Shine' series. 

Today we have a bright and inspirational art journal page by 

Shilpa Nagaonkar from India. Shilpa was inspired by our
 current challenge HERE.

Shilpa showed us a sneak peek in the mood board reveal 
now she is sharing a photo tutorial of how she
 made her eye-catching project.


Shilpa was certainly inspired by the quote but also by the bright 
colours and the bubble-shaped elements on the mood board.


Here is little more about Shilpa:


"Hi, I am Shilpa & I live in Bangalore in India. I have been interested in art since childhood. I was a card maker but became hooked on mixed media a couple of years ago. Creating art journal pages & playing with mixed media is now my passion. Usually my creations are vibrant, lively & colourful. My art keeps me sane. 
When I'm not creating art, I am a voracious reader & enjoy cooking!

I love to connect with people. You can find my blog here, Facebook page here,
 Pinterest here & Instagram here"

------------------------------------------------------------------------


1.  Apply white gesso onto the background paper. This creates a good 

base for many layers of inks & paints.


2. Spray teal & pink inks. Spread them by spritzing water then heat set them with a heat tool. This allows you to create another layer & the colours don't mix.


3. Spritz orange & green inks layers & dry as above.


4. Create circles with the bubble stencil & acrylic paints in various colors.


5. Stamp the image with archival ink & colour it with watercolour markers.


6. For more depth, stamp text and texture stamps with black/grey archival 
ink. Apply glitter paint on circles & add the sentiment.


7. Adhere the papers to the art journal & your pages are complete!


Shilpa's bright and bubbly art journal spread:


The glitter paint on the circles gives the pages a sparkly lift!


Shilpa used a pen to outline & add details to her quote.


The stunning stamped image is beautifully coloured.


The products Shilpa used:


Supplies List:
Stencil - Prima - Bubble
Stamp - Crafty Individuals - Just Be My Friend
Ink - Ranger - Jet Black Archival 
 Gesso - Design Memory Craft
 Spray Inks - Lindy's Stamp Gang - Tibetan Poppy Teal, 
Cotton Candy Pink & Freaky Franken Lime
 Spray Inks - Heidi Swapp Color Shine - Peach
Acrylic Paint - orange, teal & pink
Glitter Paint - pink & teal
Watercolour paper


Please leave a comment if you enjoyed Shilpa's tutorial
& remember every comment you leave puts you in the running
to win our $50 FOLLOWERS' PRIZE from The Dusty Attic!

Remember - there are only 7 days left to enter this month's challenge!
To be in with a chance to win 1 of our 11 amazing prizes you'll need to be quick!

You can find the challenge details here.

Complied & posted by Heather McMahon


Thursday 24 September 2015

Photo Tutorial by Priscilla Lim
{Design Team 'Moment To Shine'}


Hello SATW friends! It's Heather McMahon back with you 
today to welcome you to another photo tutorial in our 
Design Team 'Moment To Shine' series. 

Today we have a beautifully detailed layout by 

Priscilla Lim from Singapore, inspired by our
 current challenge here.

Priscilla showed us a sneak peek in the mid-month reveal 
now she is sharing a photo tutorial of how she
 made her gorgeous project.


Priscilla took her inspiration from the rose, the calligraphy
 & the pen in this month's beautiful mood board.


Let's learn a little more about Priscilla...


"Hello everyone!  My name is Priscilla Lim from the sunny island of Singapore.  I'm a full time working mum. I started scrapping in 2007 when my son Gabriel was born. I LOVE scrapping with a capital L!  Playing with pretty things & mediums is my number ONE passion.

Scrapping has come a long way for me over the years
 from being just simple fun to being therapeutic, to
 being addictive! If I can't scrap for a while, I get
 grouchy!  I'm so thankful & excited to be a
 part of this awesome team, woohoo!!

You can find me on my Blog here, 
 Facebook here, Instagram here, 
You Tube here & Pinterest here."

---------------------------------------------------------------------------------

 1 ) Prime the background paper with a layer of transparent gesso. 
When dry, stencil a crackled effect with white gesso.


2) To highlight the cracks, mist them generously with vibrant yellow spray. 
Tilt the paper to allow the extra mist to flow downwards.


3) Apply a second layer of cracks with the stencil & gesso.
When dry, add some splatter effects with pink, green & white paint.


4) Utilise some packaging by distressing the edges & inking with Distress Ink.


5) Apply white gesso through a flower stencil onto the background & apply
platinum texture paste through the same stencil onto the recycled packaging. 
Adhere the packaging to the page leaving edges free to tuck items under. 


6) Coat the chipboard with 2 layers of white gesso for an even finish.
Using archival ink, create different looks by stamping 1 chipboard 
shape with a crackle stamp & 1 with a script image stamp. 


7) On the heart swirls chipboard, lightly brush a coat of the yellow mist used previously. 
The stamping won't bleed as archival ink is permanent.


8) Swipe blue paint around the edges of two copies of the same photo. 
Adhere one on top of the other as shown on the layout.


9) Layer tags and embellishments under & around the photos.
Include diecuts, alphabet thickers & flowers.


10) Add some gauze between both photos & some micro beads around 
the photo & in the bottom of the open heart.


11) Dab some white gesso on to the flowers & you're done!


The finished layout showing all the gorgeous details.


Look at the gorgeous layering & the unique title placement.


Notice how Priscilla has layered chipboard on other embellishments 
then layered more items on top of the chipboard for extra impact.


The clear & striking photo ensures it remains the feature of the page.


The products Priscilla used:


Supplies List

Patterned Paper - Echo Park {For the Record 2}
Mist - Tattered Angels Chalkboard Mist - Pot of Gold
Paint - 13Arts Ayeeda Acrylic Paint - Raspberry, Blue & Green
Gold Micro Beads - 13Arts
Stencils - Prima Marketing - Wild Flower & Crackle
Stamps - Prima Marketing - crackle stamp /
Stampers Anonymous - script stamp
Inks - Ranger Distress - Scattered Straw / StazOn - Jet Black
White Gesso - Daler Rowney
Alphabet Thickers - American Crafts
Misc. wood clock, chipboard, stickers, tags & gauze 


Please leave a comment if you enjoyed Priscilla's tutorial
& remember every comment you leave puts you in the running
to win our $50 FOLLOWERS' PRIZE from The Dusty Attic!

Remember - there are only 6 days left to enter this month's challenge!
To be in with a chance to win 1 of our 11 amazing prizes you'll need to be quick!

You can find the challenge details here.

Complied & posted by Heather McMahon